

VirtualBox is a free, open-source virtualization software platform developed by Oracle that allows you to run multiple operating systems on a single physical machine. With VirtualBox, you can create and run virtual machines (VMs) on your computer, each of which runs a separate operating system and can be configured with its virtual hardware.
VirtualBox has various amazing features but this article centers on only one feature. This article will guide you through importing Virtual Appliances on VirtualBox and how to maximise them for the best experience.
What is a Virtual Appliance?
A Virtual Appliance is a pre-built software application/appliance, installed and packaged with an operating system (OS), into a Virtual Machine (VM) image file, created to run in a virtual environment. With a Virtual Appliance, you can deploy and operate software applications or services in a virtualized environment easily. You do not need locally installed or configured hardware because they can be accessed remotely through a user’s web browser.
Virtual appliances can be distributed in a single file format such as Open Virtualization Format (OVF) or packaged in formats specific to particular Virtual Machine containers like VMware, VirtualBox, Hyper-V or Amazon EC2.
How does Virtual appliances work?
When you want to import a Virtual appliance on VirtualBox, you will be asked to choose the source you want to import from. This can either be from a local file system to be imported in an OVF format or from a known cloud provider. Virtualbox then extracts the necessary information from the Virtual appliance file and then uses it to create a new Virtual Machine.
Once the import process is finished, you can start, manage and use the virtual machine as needed.
Prerequisites
To follow along with this article, you need to have the following:
A computer with at least 8 GB RAM
Windows 10 X64-bit operating system (OS)
A modern multi-core Intel/AMD CPU
VirtualBox installed. Check here.
Virtualization is enabled in the BIOS settings. Find out how to here.
Importing a Virtual Appliance
To import a Virtual Appliance using the graphical user interface (GUI), you will need to follow these steps:
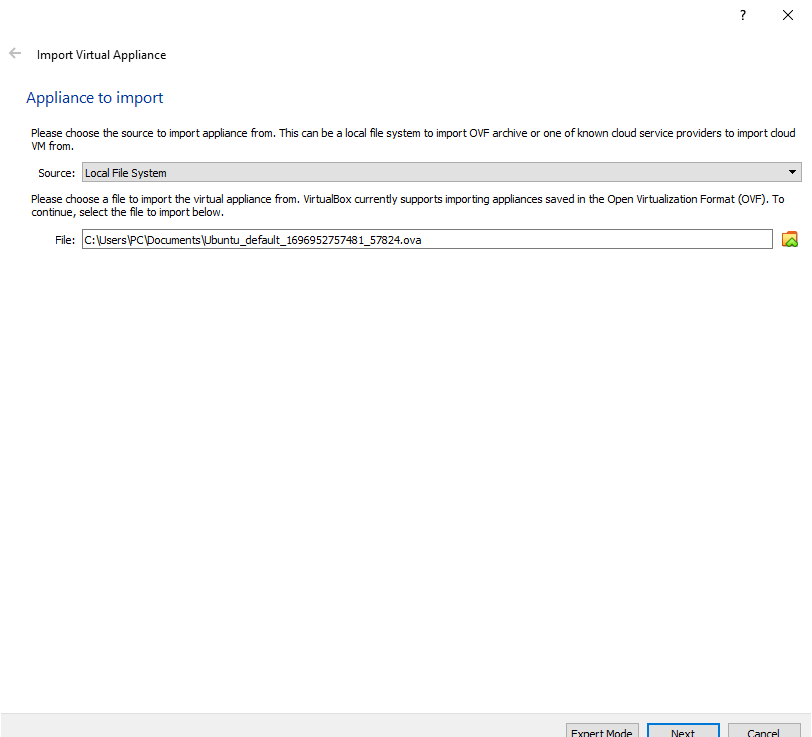
Step 1: Open VirtualBox and click on “File” at the top left corner of the interface.

Step 2: Select “Import Appliance” and click on it. Choose the source you want to import the appliance from. The file must be in a “.ova” or “.ovf” format.
Step 3: You can edit the configurations to suit your requirements.

Step 4: Click “Import” and you have successfully imported your Virtual Appliance…….
Conclusion
Aside from simplifying the deployment and management of software applications, Virtual Appliances are valuable in testing new software releases, patches, or updates in a controlled environment. They can also serve as backup or recovery solutions by enclosing backup software with pre-configured settings.
To learn more about Virtual Appliances, check out these resources: